
When the drawing is ready, you either share a live link or produce files. This page is the traffic plan path. Event plans use a different exporter — Export an event plan.
Use this when a municipality wants a URL, or when someone asked for PDF or Excel. Skip it while you are still placing signs.
Sharable link (recommended) vs Export files
Click Export in the editor header. The screen is How would you like to export your map?
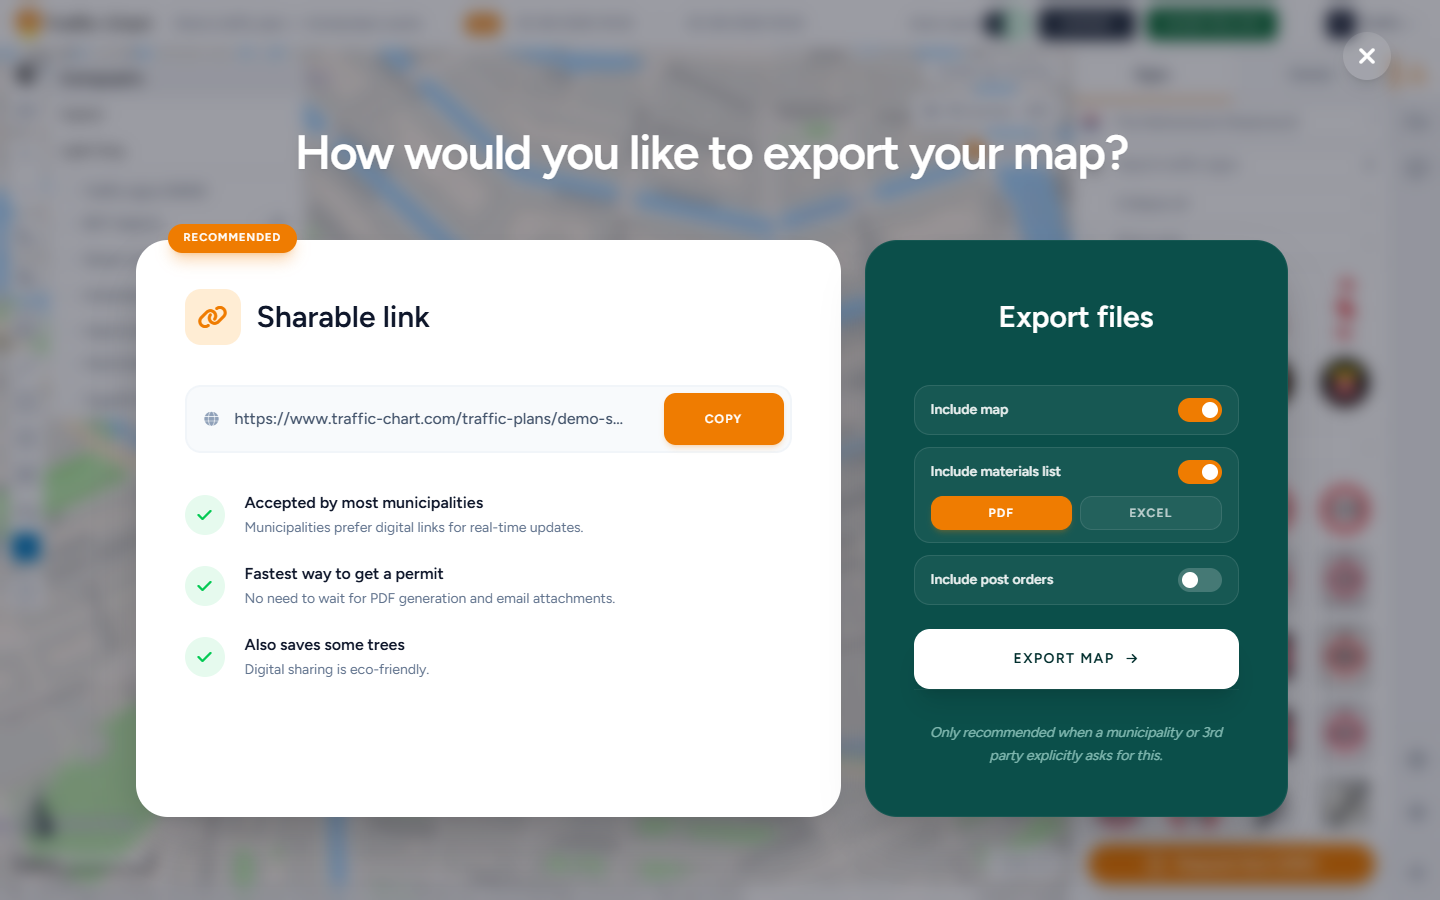
Sharable link is marked RECOMMENDED. Copy it with Copy (Link copied to clipboard). Benefits in that panel: Accepted by most municipalities, Fastest way to get a permit, Also saves some trees.
The link is the same public URL as Copy link on Plans. It stays current after you save. How it behaves: Share a plan and read-only view.
Export files is the file path. On-screen warning: Only recommended when a municipality or 3rd party explicitly asks for this.
In that column you can toggle:
- Include map
- Include materials list — then PDF and/or Excel
- Include post orders (when the catalogue has post signs)
The main button is Export map if you included a map (or Excel, which needs an export rectangle). Otherwise it is Export files.
Excel shows a Pro badge when you cannot use it (This is a pro feature.). You also need to be logged in with a saved plan (Log in and save the plan before exporting Excel.).
Draw export maps
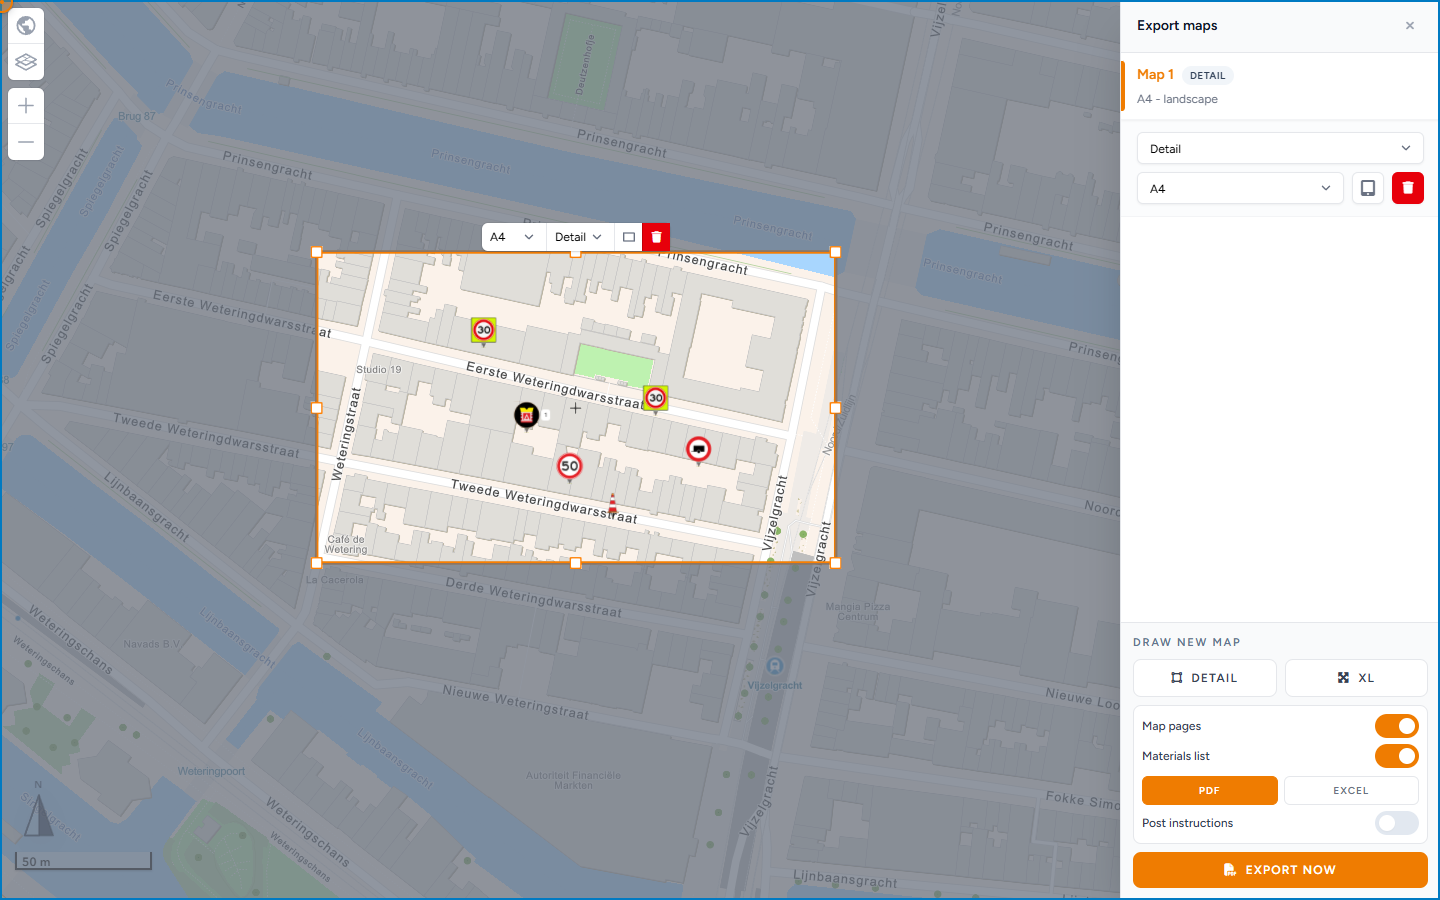
An export map is a rectangle on the basemap. Each one becomes a PDF page. The sidebar accessible name is Traffic plan export maps. The heading is Export maps.
| Type | Role |
|---|---|
| Detail | Standard page. Size is limited so signs stay readable |
| XL | Larger coverage. XL maps require a PRO account. |
Steps
- Save, or wait for Auto-save: saved.
- Export → set Include map (and materials / post orders if you need them) → Export map.
- The Export maps sidebar opens (Traffic plan export maps). Empty state: No export maps yet. Use Draw new map below to add a Detail or XL map. Start below points at Draw new map. In read-only export: No export maps have been added to this plan.
- Under Draw new map, click Detail or XL.
- Drag a rectangle over the area you need on paper.
- Select Map 1 (and later maps). Set Paper size and Change orientation. Until paper is chosen the row shows No paper size.
- Confirm Map pages, Materials list, and Post instructions.
- If Materials list is on, choose Materials PDF and/or Materials Excel.
- Click Export now (while it runs: Exporting...). Keep the tab open. Open the download and check every page.
You need at least one export map before PDF export is enabled (Add at least one export map to enable export.).
The whole path in one run: Export, then Export files, then Detail, drag the rectangle over the works, set A4 - landscape, and Export now. The progress list ticks through Export maps and Materials list before Download started! appears.
If a Detail rectangle hits its limit: This detail map has reached its maximum size. Switch it to XL map if you want to export a larger map. Changing Scale: can reset Detail maps — confirm Confirm scale change only if you accept redrawing them.
Close export mode returns you to the editor. While the file is handed to the browser: Starting download / The PDF is ready. Your browser is starting the download now. After a successful file: Download started / Your export is ready and the PDF download has started. / Your download has started. Back to export maps if you need another run.
Paper size and orientation
Each export map has its own Paper size (A4, A3, and other series in the list) and orientation.
Match what your municipality or printer expects (for example A3 landscape). XL still needs a paper size — content scales to that page. It is not infinite paper.
Remove export map deletes that rectangle.
XL maps (Pro)
Use Detail for junctions that must stay sharp. Use XL for a larger overview. Without Pro, XL stays disabled with a Pro badge and XL maps require a PRO account. Paying for unlimited signs on the plan does not by itself unlock XL.
An existing rectangle can change type: select the row and use the Export type select (Detail / XL). That is the fix for This detail map has reached its maximum size.
Detail frames: one overview drawing
A file pack of separate pages leaves the municipality guessing which junction each page covers. Detail frames answers that on the paper itself: the XL page gets a numbered orange box around every Detail map that sits inside it, labelled MAP 1, MAP 2, and so on. They carry the same numbers as the rows in the sidebar.
One XL page with frames, plus a Detail page per junction, is the overview drawing most municipalities want.
Detail frames is a switch on the export map row, and only on XL rows. Detail rows do not have it, so draw the detail maps first.
Steps
- Draw a Detail map over each junction first. Until one exists the switch stays greyed out: Add a detail map first to show frames.
- Zoom out until one rectangle can cover all of them.
- Draw new map → XL, and drag it over the whole works.
- Click that row to select it (Map 3 in the example below).
- Set its Paper size and use Change orientation. A3 landscape reads well for an overview.
- Turn Detail frames on. The row picks up a Frames badge, and the numbered boxes appear on the map immediately, so you can check the framing before you spend an export on it.
- Turn on XL maps first so the overview is page 1 rather than the last page.
- Export now, and open the PDF.
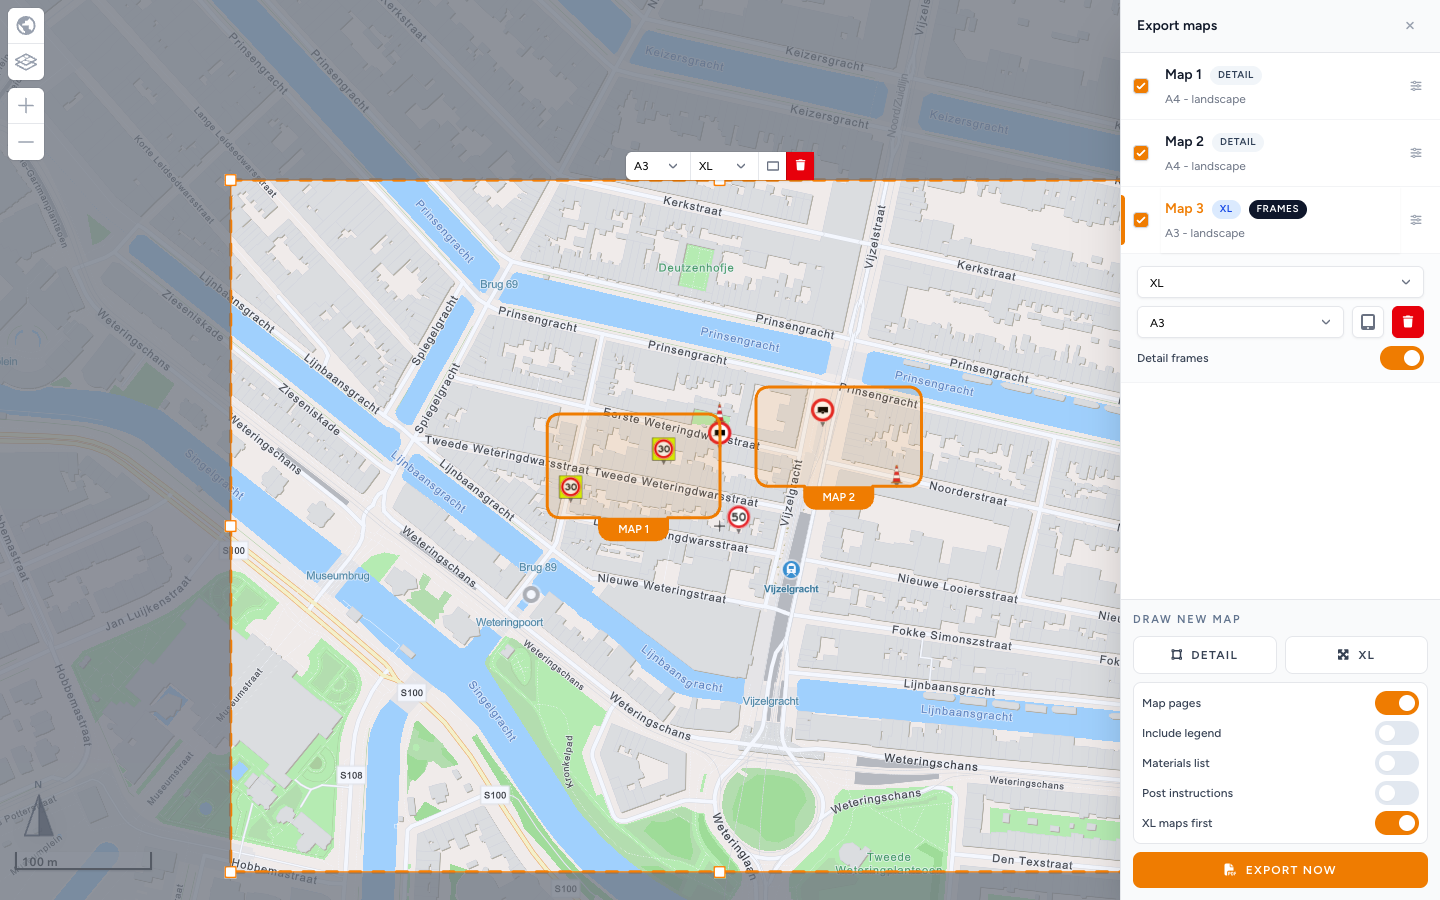
Only Detail maps that overlap the XL rectangle get a box. A Detail map elsewhere in the plan is left off that page. That is what you want when the works run along two streets and each gets its own XL.
Frames belong to that one XL map. If you also want a clean overview without boxes, draw a second XL map over the same area and leave its Detail frames off. The tooltip says the same: Draws numbered boxes for overlapping detail maps on this XL page. Add another XL map if you also want an overview without frames.
What it looks like on paper

Page 1 of the export. The MAP 1 and MAP 2 boxes mark the two Detail pages that follow, so the reader can go straight from the overview to the right page. The header carries the plan title and date range, and the footer the author and Format: A3 - Map 3 - XL.
Page order: XL maps first
XL maps first sits with Map pages and Materials list at the bottom of the sidebar, and only appears when the export holds both a Detail and an XL map.
- On: XL pages come before Detail pages. Use this for an overview drawing: the reader sees the whole works, then the junctions.
- Off: the pages follow the order of the rows in the sidebar.
Choose which maps go in this export
From two export maps upwards (with Map pages on), each row gets a checkbox. Use it when a plan holds ten rectangles and today's request is for two of them. You do not have to delete the others.
- The checkbox is Add to this export / Remove from this export.
- Select all in the sidebar header puts every map back in.
- Under the Export maps heading you see how the export stands, for example 2 of 3 in this export. Rows that are out are dimmed.
- The button counts what you picked: Export 1 map, Export 3 maps. With everything selected it stays Export now.
- Deselect everything and the button is disabled: Select at least one map to export.
- If the picked maps cannot be exported at all (no paper size, or XL without Pro): None of the selected maps can be exported.
Rectangles you leave out stay on the plan for the next run.
Layers per export map
Each row has a Layers button (the sliders icon). It opens a small panel, headed Layers, that hides plan content on that page only:
| Option | Hides |
|---|---|
| Traffic Signs | Placed signs |
| Lines & Shapes | Sketch lines, rectangles, circles, shapes |
| Text Areas | Map text |
| Bulk Placement | Bulk lines and their signs |
| GPX Imports | Imported GPX tracks |
The button carries an orange dot while that map hides anything. Use it for an XL overview that should show the works area without every cone on top of it, while the Detail pages keep the full drawing. This is per export map. It does not change the editor or the other pages.
PDF preview
PDF preview (right side of the map) shows paper-relative sizing while you edit, with Off / On. It appears when your account can use XL maps.
- Turn PDF preview On.
- If you have no XL map yet, Draw preview map, pick Paper size, then Draw XL map.
- Choose an existing map from Select XL map, or Detail mode to leave the selector empty.
- Lock preview map before selecting some objects (Lock the preview map to select this object.). Unlock preview map when you need to move the rectangle.
- Adjust placements for readability at paper scale.
- Turn preview Off, then run a real Export now.
Scale cannot be changed while PDF preview is on. Preview is not a substitute for checking the downloaded PDF.
Toast after creating a map: XL map created. Unlock the preview map to move or resize it.
The chip, Select XL map, Draw XL map, and Lock preview map: PDF preview.
Materials list
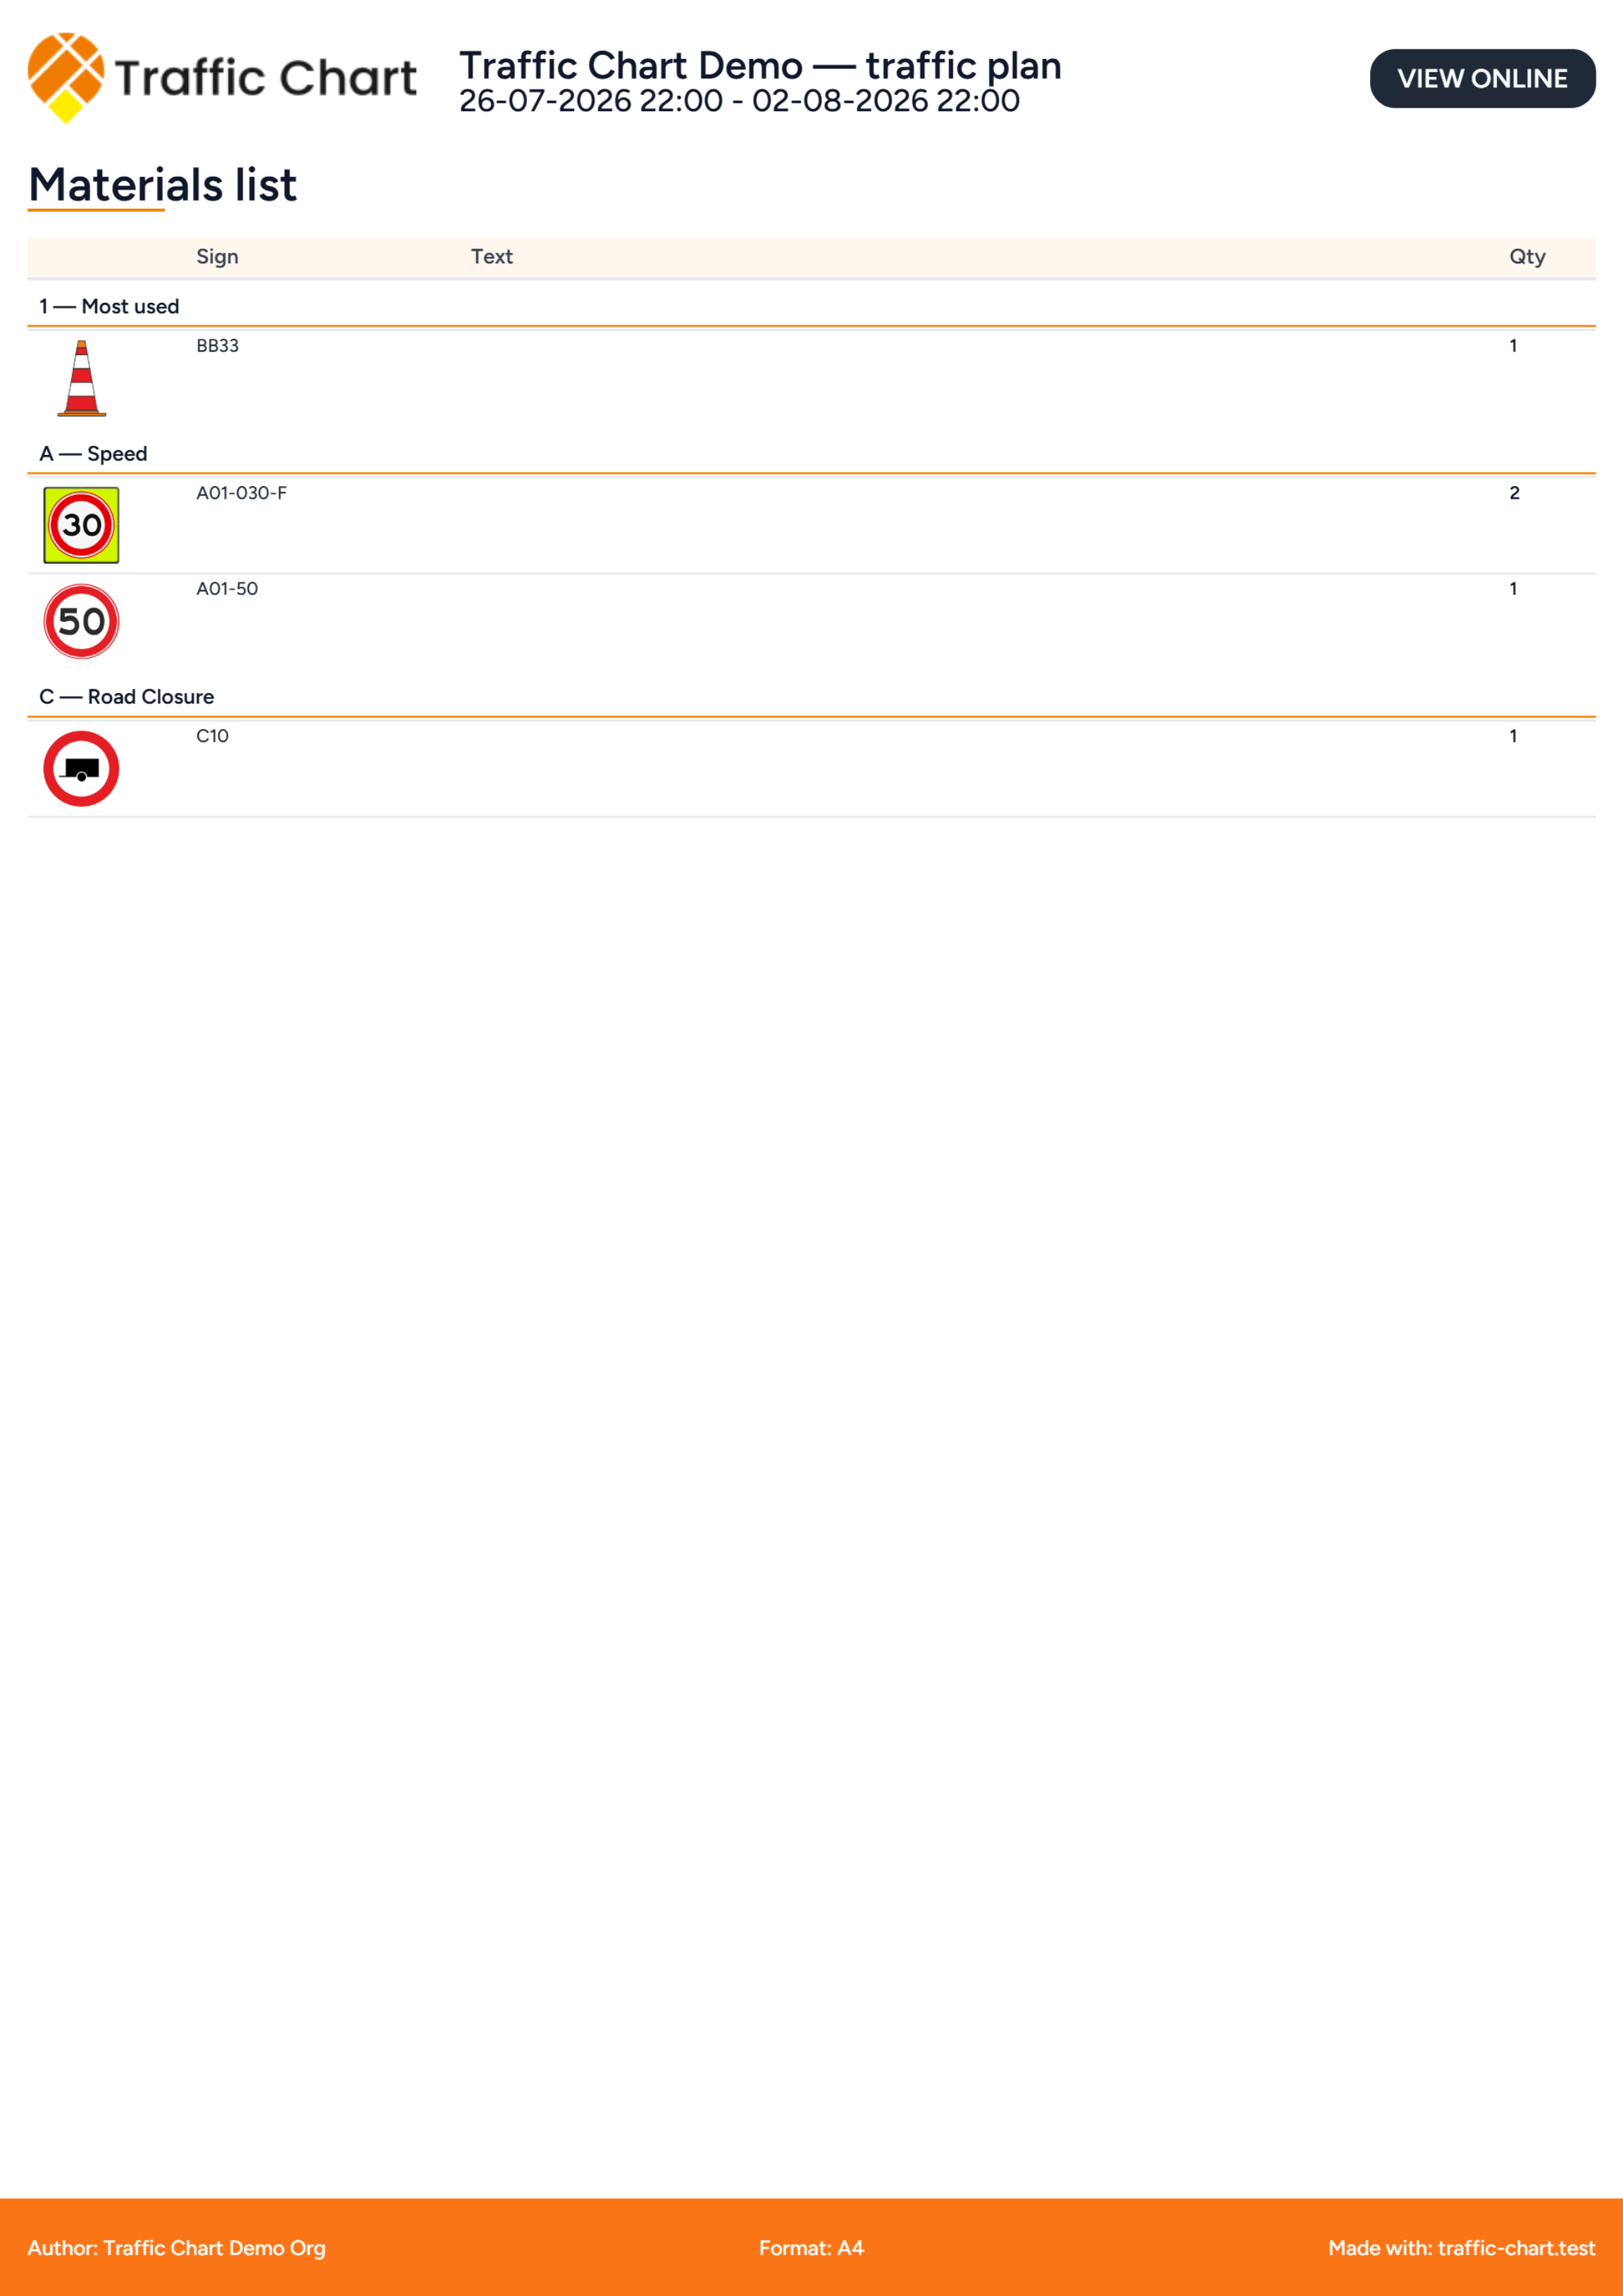
Materials list is the packing list: types and Qty, plus Stacked signs as a mounting overview (those plates are already in the totals).
- Enable Include materials list on the export choice, or Materials list in the export sidebar.
- Choose PDF / Materials PDF and, if you have access, Excel / Materials Excel.
- Export and check the extra PDF pages (and the spreadsheet).
Excel description: Download the materials list as an Excel file with a total tab and one tab per drawing. Unsaved changes are saved first. Excel needs at least one export map (Create an export map first.).
Combination signs appear under the Name you set on the board. Bulk lines show as bulk quantities. Packing-list columns, Excel, and post-order cards: Materials list and post orders.
What the exported PDF looks like
One page per export map, then the extras you ticked. The map page carries the plan title, the date range, a scale bar, and a north arrow.
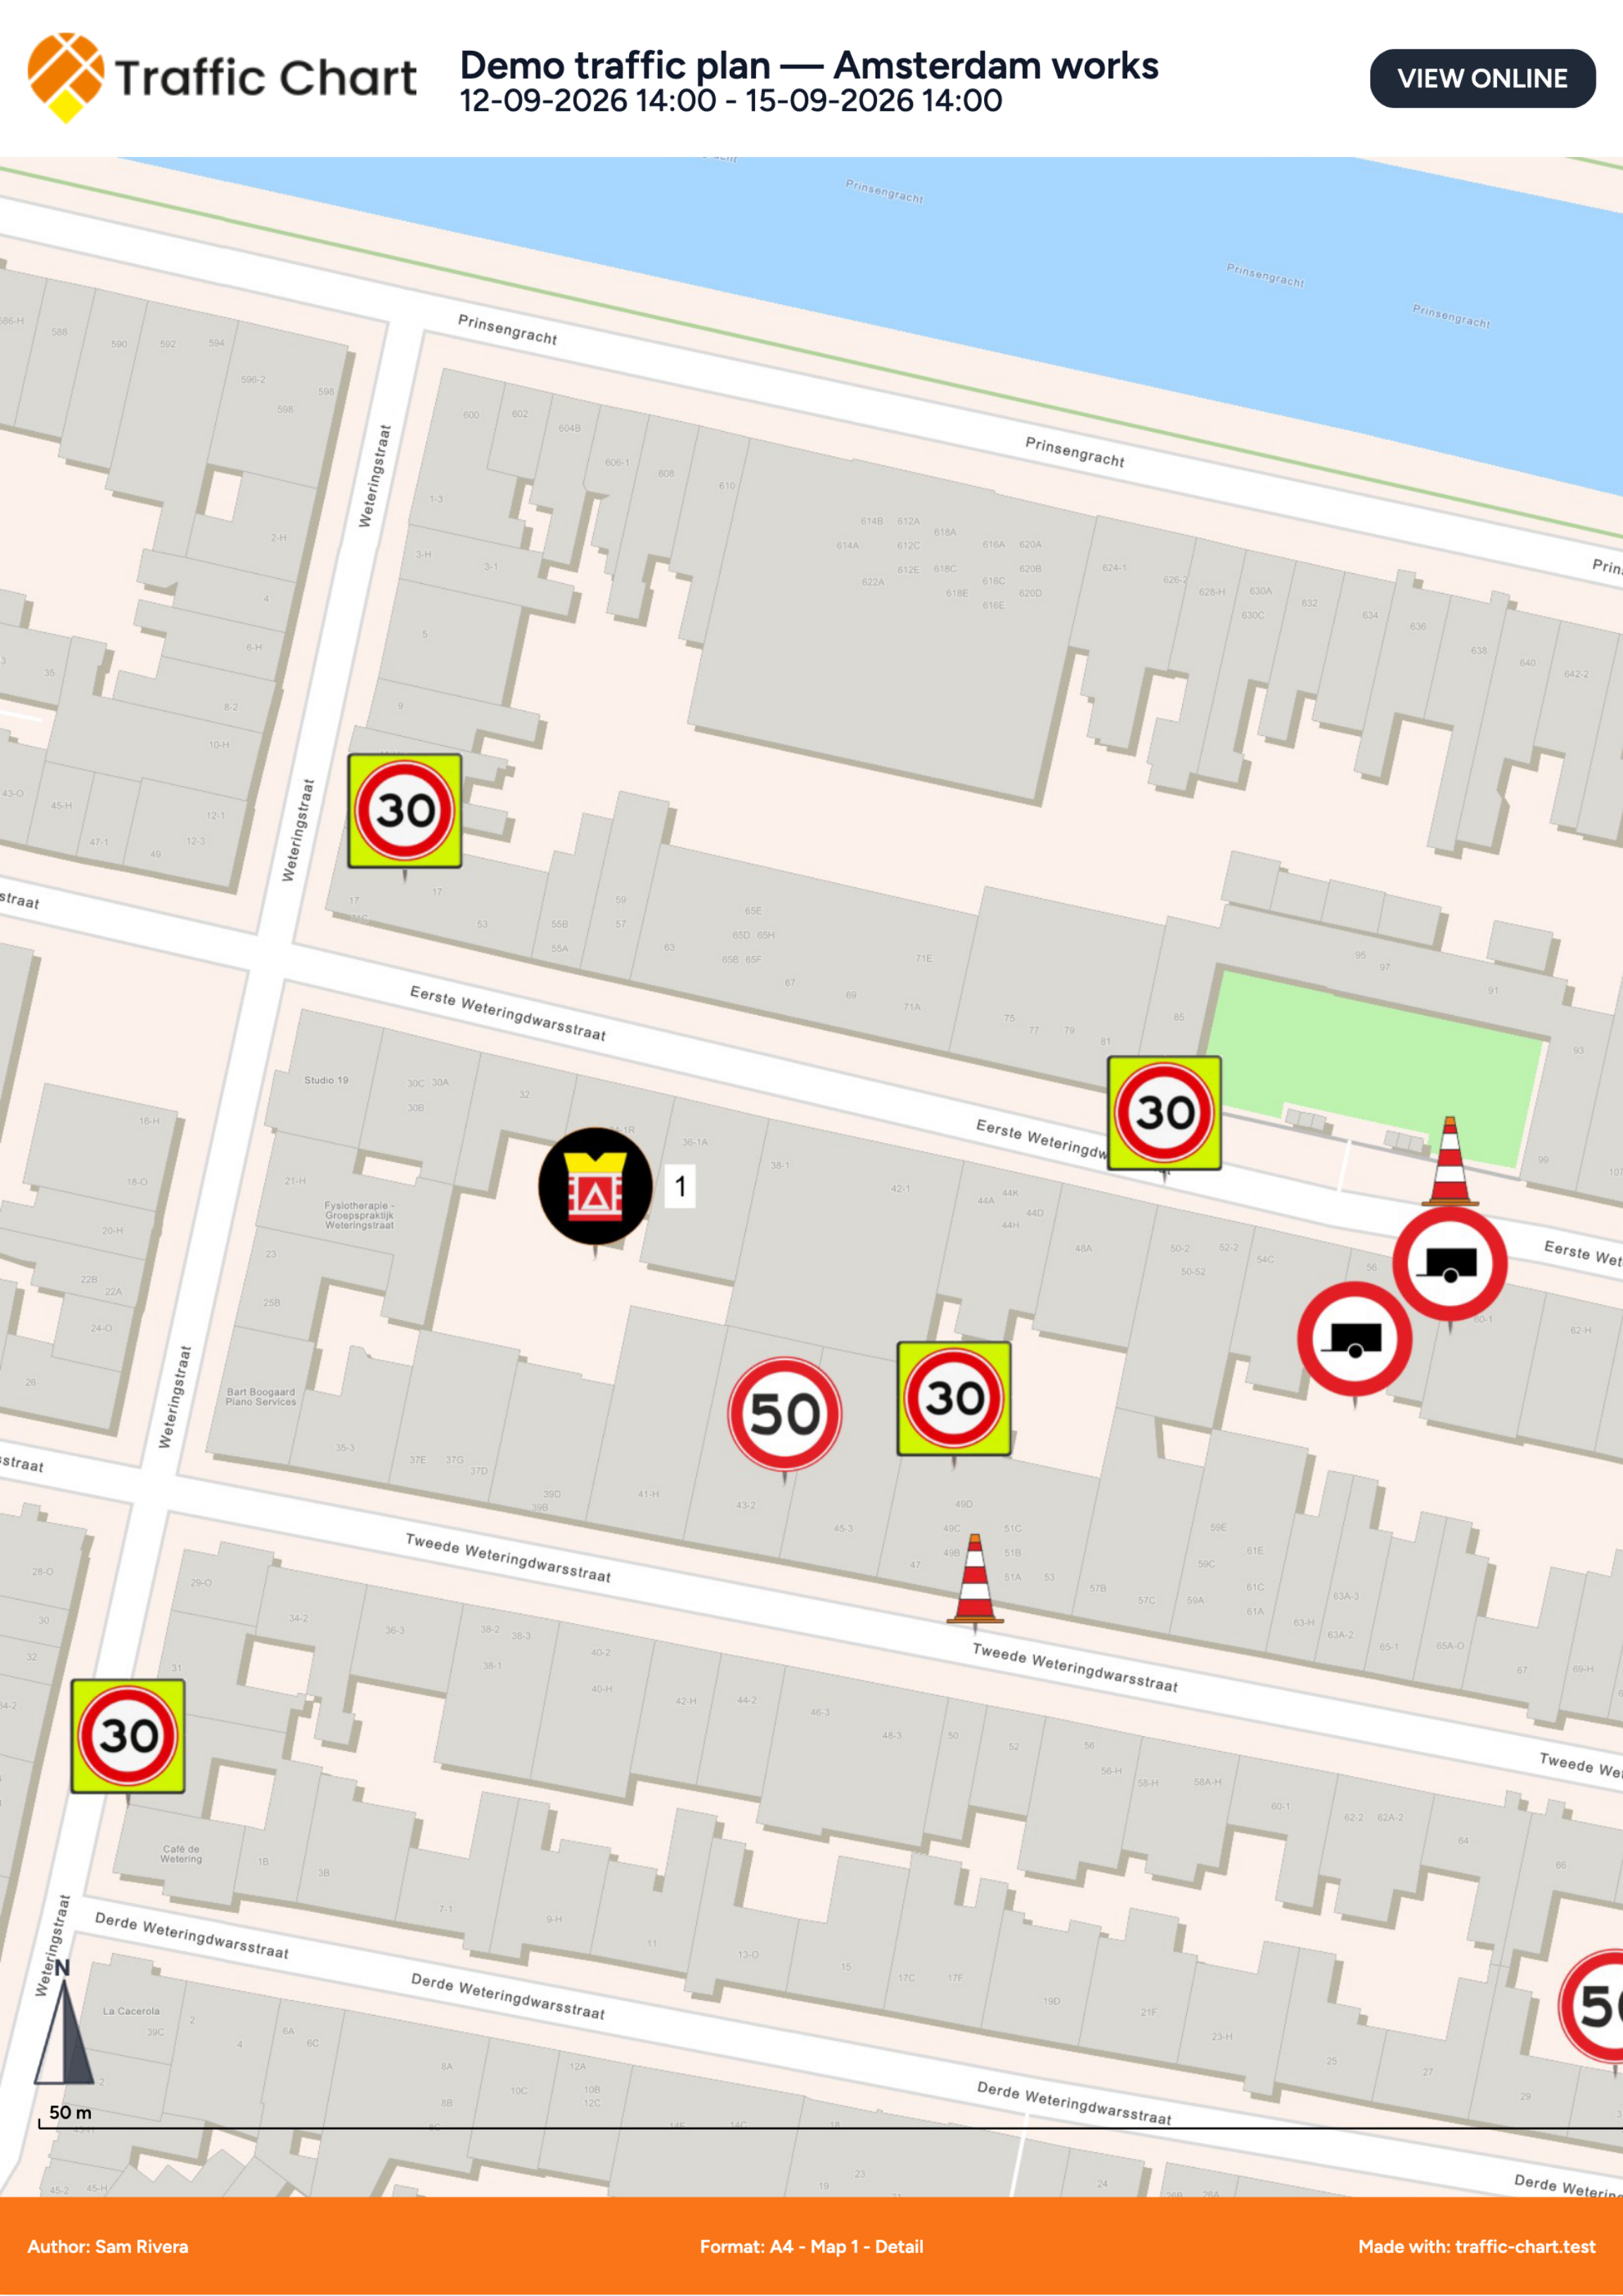
The materials page follows, listing each sign type with its code and Qty, grouped by catalogue category.
Post orders
Post orders are instructions for traffic controllers.
- Open Posts (Manage traffic controllers and their orders per post.).
- Place a post item from Post items if the country has them (No post signs available for this country. otherwise).
- Select a post: Post name (label), Orders. Move post up / Move post down, Go to post, Google Maps.
- Save.
- On export, enable Include post orders (choice screen) or Post instructions (sidebar).
Fill instructions before the crew PDF goes out.
Every label on the sidebar and the progress panel
The Export maps sidebar and the progress panel between them carry about seventy distinct strings. They have their own page so this one stays a walkthrough: Export labels and progress messages.
When PDF fails
Leave the tab open if you see This is taking longer than usual. A slow network connection can delay map tiles and layers. Please keep this window open while the export finishes. Check the file if Some map layers took longer than expected to load. The export may be incomplete; please check the PDF before using it.
After a failure, Export Feedback may appear. Stay logged in if asked (Log in to send export feedback.), describe blank pages or stuck progress, and Send feedback. You can also use How did the export go? after a successful run. After send: Feedback sent / Thanks for the feedback. We use this to keep improving PDF exports.
What good looks like
Municipalities who can work from a URL have Sharable link. File packs open on an XL overview with Detail frames on, so MAP 1 and MAP 2 on that page point at the Detail pages behind it, followed by a Detail page per junction, materials pages that match the map, and post orders the crew can follow. You opened the PDF before you sent it.
If something blocks you
| Situation | Where to go |
|---|---|
| Blank or stuck PDF | Export fails or is blank |
| XL or Excel locked | Feature not available for my account |
| Detail frames greyed out | No Detail map yet: Add a detail map first to show frames. |
| A Detail page has no box on the overview | That rectangle does not overlap the XL rectangle |
| Cannot draw rectangles | Read-only or review lock — I can’t open or edit a plan |